انجمن مدیران و راهبران شبکه
Network Managers and Administratorsانجمن مدیران و راهبران شبکه
Network Managers and Administratorsدرباره من
 Iman Mojtahedin Yazdi/ایمان مجتهدین یزدی, **
مشاور در امور طراحی ، راهبری و توسعه زیرساخت مراکز داده و امنیت شبکه**
BS. Computer Hardware Eng**
M.Sc. Computer Network Engineering**
Cisco Certified Network Associate, CCNA**
Cisco ID. CSCO11510615**
Mobile: 09155071040**
E-mail: mojtahedin@gmail.com**
ادامه...
Iman Mojtahedin Yazdi/ایمان مجتهدین یزدی, **
مشاور در امور طراحی ، راهبری و توسعه زیرساخت مراکز داده و امنیت شبکه**
BS. Computer Hardware Eng**
M.Sc. Computer Network Engineering**
Cisco Certified Network Associate, CCNA**
Cisco ID. CSCO11510615**
Mobile: 09155071040**
E-mail: mojtahedin@gmail.com**
ادامه...
راه کاری جهت رفع مشکل عدم امکان دسترسی به کنسول وب Cisco Prime Infrastructure
برخی اوقات سرویس وب سیستم Cisco Prime Infrastructure به دلیل رشد اطلاعات LOG در شاخه و کاهش شدید فضای دیسک متوقف شده و دسترسی به سرور مختل می گردد. در این شرایط با استفاده از وارد کردن دستور زیر در محیط Shell میتوان مشکل را برطرف کرد:
ncs reload
ncs start
پیکربندی تانل IP-SEC بصورت Site-To-Site VPN بر روی لینک Point To Point بین دو روتر سیسکو
پیکربندی تانل IP-SEC بصورت Site-To-Site VPN بر روی لینک Point To Point بین دو روتر سیسکو
سلام 
مطلبی که امروز تو این پست خدمتتون ارائه می کنم در حقیقت بازخوانی روایتیست از ویدئوی آموزشی جناب آقای Eric Spengler که در آرشیو YouTube به آدرس https://www.youtube.com/watch?v=aJB0E3_C4dQ و به شیوه بسیار شیوا و روان و البته فقط در حد اطلاعات لازم و کافی ارائه شده است.
لذا در این قسمت ضمن بازخوانی مجدد مطالب این فیلم آموزشی، قصد دارم با تجزیه و تحلیل زوایای فنی دستورات بکار رفته در پیکربندی IP-SEC ، با دقت و تمرکز بیشتری بصورت گام به گام در صدد درک بهتر نحوه پیکربندی این مکانیزم امنیتی برآییم.
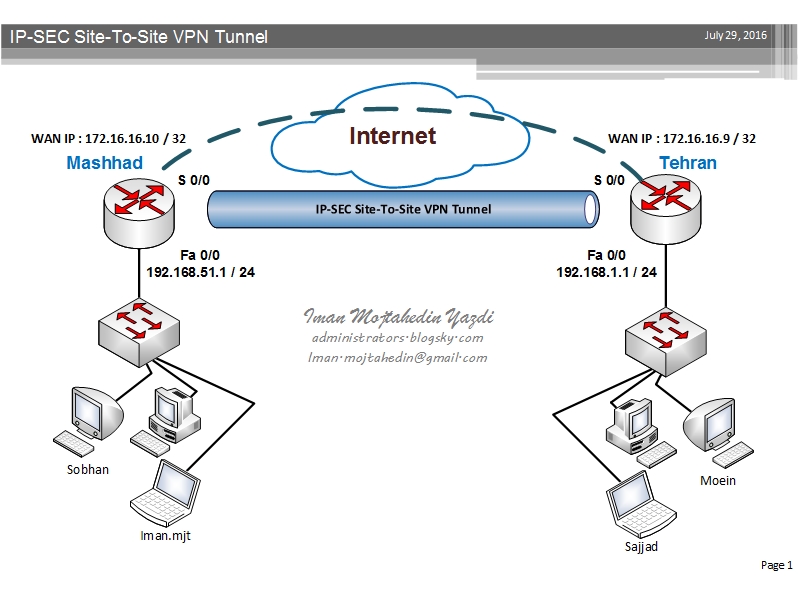
طبق اطلاعات عنوان شده در این ویدئو، پیکربندی تانل IP-SEC بصورت Site-To-Site VPN شامل 5 مرحله به شرح موارد زیر میباشد:
- مرحله اول: پیکربندی ISAKMP Policy که طی آن پارامتر های مختص به فاز اول ایجاد تانل IP-SEC یعنی مرحله برقراری Trust relation sheep بصورت تنظیم Pre-Shared key یا Certificate مشخص و در هر دوطرف تنظیم می گردد.
- مرحله دوم: پیکربندی Transform set که در جریان آن پارامتر های مربوط به فاز دوم تانل IP-SEC و متد Encryption ، سایز کلید و الگوریتم Hashing مورد استفاده در جهت رمزنگاری داده های عبوری از داخل تانل مشخص می شوند.
- مرحله سوم: مشخص نمودن ترافیک عبوری از داخل تانل از طریق تعریف Access-List می باشد.
- مرحله چهارم: تعریف Crypto MAP جمع بندی و تعریف روابط بین پارامتر های تعریف شده در مراحل قبل خواهد بود.
- مرحله پنجم: و آخرین قدم در بهره برداری از تانل امن IP-SEC شامل مشخص نمودن اینترفیس فیزیکی یا GRE Tunnel ی خواهد بود که قرار است ترافیک تانل IP-SEC از طریق آن به سمت روتر طرف مقابل هدایت شود.
Step By Step configuration of site-to-site IP-SEC VPN tunnel:
!========== phase 1 ================================
crypto isakmp policy 10
encr aes 256
authentication pre-share
group 5
lifetime 3600
crypto isakmp key imanP@SS address 172.16.16.10
!
crypto ipsec security-association lifetime seconds 1800
!
!========== phase 2 ================================
crypto ipsec transform-set TRNFSiman esp-aes 256 esp-sha-hmac
!========== phase 3 ================================
crypto map CMAP 10 ipsec-isakmp
set peer 172.16.16.10
set security-association lifetime seconds 900
set transform-set TRNFSiman
match address 123
!========== phase 4 ================================
access-list 123 permit ip 192.168.1.0 0.0.0.255 192.168.51.0 0.0.0.255
!========== phase 5 ================================
ip route 192.168.51.0 255.255.255.0 FastEthernet0/0
!========== Last step ==============================
TEHRAN(config)#interface fastEthernet 0/1
TEHRAN(config-if)#crypto map CMAP
جهت ارزیابی و پایش وضعیت تانل و بررسی ترافیک انتقال داده شده از روی آن می توانید از دستورات زیر استفاده کنید:
پیکربندی Accounting بر روی تجهیزات روتر و سوئیچ Cisco

-------------------------------------------------------------------------------------
برای این منظور پس از آماده سازی سرور Accounting مراحل زیر را دنبال کنید:
- فعال سازی متد AAA
Room(config)#aaa new-model
- مشخص کردن آدرس سرور
Room(config)#tacacs-server host 192.168.1.10 key 0 mypass
- مشخص کردن اولویت مرجع احراز کننده هویت
Room(config)#aaa authentication login default group tacacs+ local enable
در مرحله بالا با وارد نمودن کلمه default به سوئیچ می فهمانیم که در فرایند احراز هویت ابتدا به سراغ سرور tacacs+ رفته، اگر آن سرور در دسترس نبود به سراغ یوزر های تعریف شده در داخل سوئیچ یا سرور برود و اگر چنین یوزری تعریف نشده بود می تواند از طریق پرسیدن کلمه عبور Enable نسبت به احراز هویت کاربر اقدام نماید.
-------------------------------------------------------------------------------------------------------------------------------------
Cisco ASA 5500 Series RESET Factory - ریست کردن تنظیمات فایروال سیسکو
نقطه سر خط.
اگر شما هم مثل من در حین یادگیری CCNA Security افتادین به جون فایروال سیسکو و خودتون هم نفهمیدین که چیکار کردین و هنوز امیدی برای وارد شدن به مود Enable فایروالتون هست، می تونین با وارد کردن دستور زیر همه چیز رو مثل روز اولش کنید:

imanASA# configure terminal
imanASA(config)# config factory-default
Based on the management IP address and mask, the DHCP address
pool size is reduced to 253 from the platform limit 256
WARNING: The boot system configuration will be cleared.
The first image found in disk0:/ will be used to boot the
system on the next reload.
Verify there is a valid image on disk0:/ or the system will
not boot.
Begin to apply factory-default configuration:
Clear all configuration
WARNING: DHCPD bindings cleared on interface 'management', address pool removed
Executing command: interface management0/0
Executing command: nameif management
INFO: Security level for "management" set to 0 by default.
Executing command: ip address 192.168.1.1 255.255.255.0
Executing command: security-level 100
Executing command: no shutdown
Executing command: exit
Executing command: http server enable
Executing command: http 192.168.1.0 255.255.255.0 management
Executing command: dhcpd address 192.168.1.2-192.168.1.254 management
Executing command: dhcpd enable management
Executing command: logging asdm informational
Factory-default configuration is completed
ciscoasa(config)#
 خیلی شیک و مجلسی
نحوه شناساندن image جدید ASDM به Cisco ASA 5540
1- اول اینکه فایل نسخه جدید رو از آدرس زیر دانلود کنید :
ciscoasa(config)# asdm image flash:/asdm-602.bin