انجمن مدیران و راهبران شبکه
Network Managers and Administratorsانجمن مدیران و راهبران شبکه
Network Managers and Administratorsدرباره من
 Iman Mojtahedin Yazdi/ایمان مجتهدین یزدی, **
مشاور در امور طراحی ، راهبری و توسعه زیرساخت مراکز داده و امنیت شبکه**
BS. Computer Hardware Eng**
M.Sc. Computer Network Engineering**
Cisco Certified Network Associate, CCNA**
Cisco ID. CSCO11510615**
Mobile: 09155071040**
E-mail: mojtahedin@gmail.com**
ادامه...
Iman Mojtahedin Yazdi/ایمان مجتهدین یزدی, **
مشاور در امور طراحی ، راهبری و توسعه زیرساخت مراکز داده و امنیت شبکه**
BS. Computer Hardware Eng**
M.Sc. Computer Network Engineering**
Cisco Certified Network Associate, CCNA**
Cisco ID. CSCO11510615**
Mobile: 09155071040**
E-mail: mojtahedin@gmail.com**
ادامه...
بروز رسانی و نصب وصله های امنیتی بر روی سرور VMWare vCenter Appliance که در مود HA(high available) پیکربندی شده
سلام، وقت بخیر.
Patch a vCenter High Availability Environment
رفرنس این پست سایت شرکت VMWare هست . من لینک مستقیمشو اینجا براتون میزارم ولی با توجه به وضع قوانین مضحک و محدودکننده تحریم ها که دسترسی IP کاربران داخل ایران رو به پایگاه دانش برخی شرکت های آمریکایی مسدود میکنه، سعی میکنم لیست دستورهای مورد نیاز رو اینجا هم کپی کنم.
Prerequisites
Verify that patching a vCenter HA configuration is supported for your version of vCenter Server Appliance. For certain vCenter Server 6.7 patch releases, you must remove the vCenter HA configuration and update the vCenter Server Appliance using either the vCenter Server Appliance Management Interface or the software-packages utility in the appliance shell of a vCenter Server Appliance. To learn if your version of vCenter Server Appliance can be patched using this procedure, see Knowledge Base article KB 55938.
Procedure
Install vCenter Server Appliance Patche
software-packages stage --iso
software-packages list --staged
software-packages install --staged
shutdown reboot -r "patch reboot"
پیکربندی پروتکل SNMP روی VMWare vCenter Appliance
بدون مقدمه و بی حرف پیش اگر قصد اضافه کردن سرور vCenter در سامانه های مانیتورینگ شبکتون رو دارید. برای تنظیم پارامتر های SNMP می تونید مراحل زیر رو انجام بدید :
- ابتدا از طریق پروتکل SSH به ترمینال وی سنتر وصل بشید.
VMware vCenter Server Appliance 6.7.0.31000
Type: vCenter Server with an embedded Platform Services Controller
Connected to service
    * List APIs: "help api list"
    * List Plugins: "help pi list"
    * Launch BASH: "shell"

Command> - اطلاعات Community پروتکل SNMP و آدرس سرور مانیتورینگ ( مثلا Solarwinds یا Zabbix ) رو بوسیله دستورات زیر تنظیم کنید:
Command> snmp.enable
Command> snmp.set --communities public
Command> snmp.set --targets 192.168.1.254@162/public- برای چک کردن پیکربندی و تنظیمات پروتکل SNMP از دستور زیر استفاده کنید:
Command> snmp.get
Config:
   Users:
   V3targets:
   Engineid: 80001adc80ca1f753fff9d0b5d00000000
   Targets:
     1:
         Community: public
         Ip: 192.168.1.254
         Port: 162
   Syslocation: ''
   Loglevel: warning
   Privacy: none
   Processlist: False
   Pid: 19160
   Authentication: none
   Port: 161
   Enable: True
   Syscontact: ''
   Notraps: ''
   Remoteusers:
   Communities: public
Command> snmp.test
Results:
   Message: A warmStart notification was sent to 1 target.
Success: Trueرفع مشکل پر شدن پارتیشن Archive هارد اپلاینس vCenter v6.7
درود 
چند روز پیش که داشتم تو کنسول vCenter Appliance Management وضعیت زیرساخت مجازی سازی رو چک و تیک می کردم متوجه آلارم Node Health Degraded شدم که تهش متوجه شدم بخاطر پر شدن پارتیشن Archive اپلاینس بود. اگر چه وضعیت بوجود آمده بخاطر باگ سیستم هست و پارتیشن Archive ذاتا باید بعد از سرریز شدن بصورت چرخشی اطلاعات جدید رو جایگزین اطلاعات قدیمی تر کنه اما تا بر طرف شدن این باگ در آپدیت های بعدی میشه مشکل رو با Extend کردن پارتیشن به ترتیب زیر حل کرد:
Deployment / System Configuration
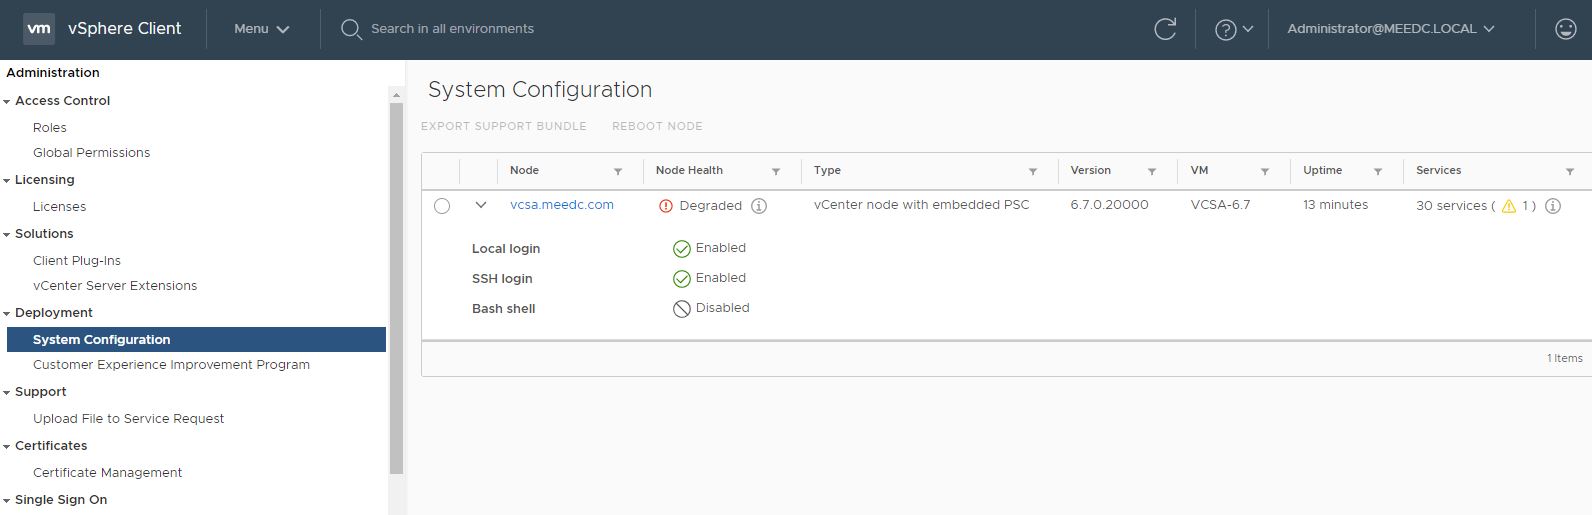
که این وضعیت همون طور که گفتم مربوط به پرشدن پارتیشن Archive بود :
Appliance Management / Monitor
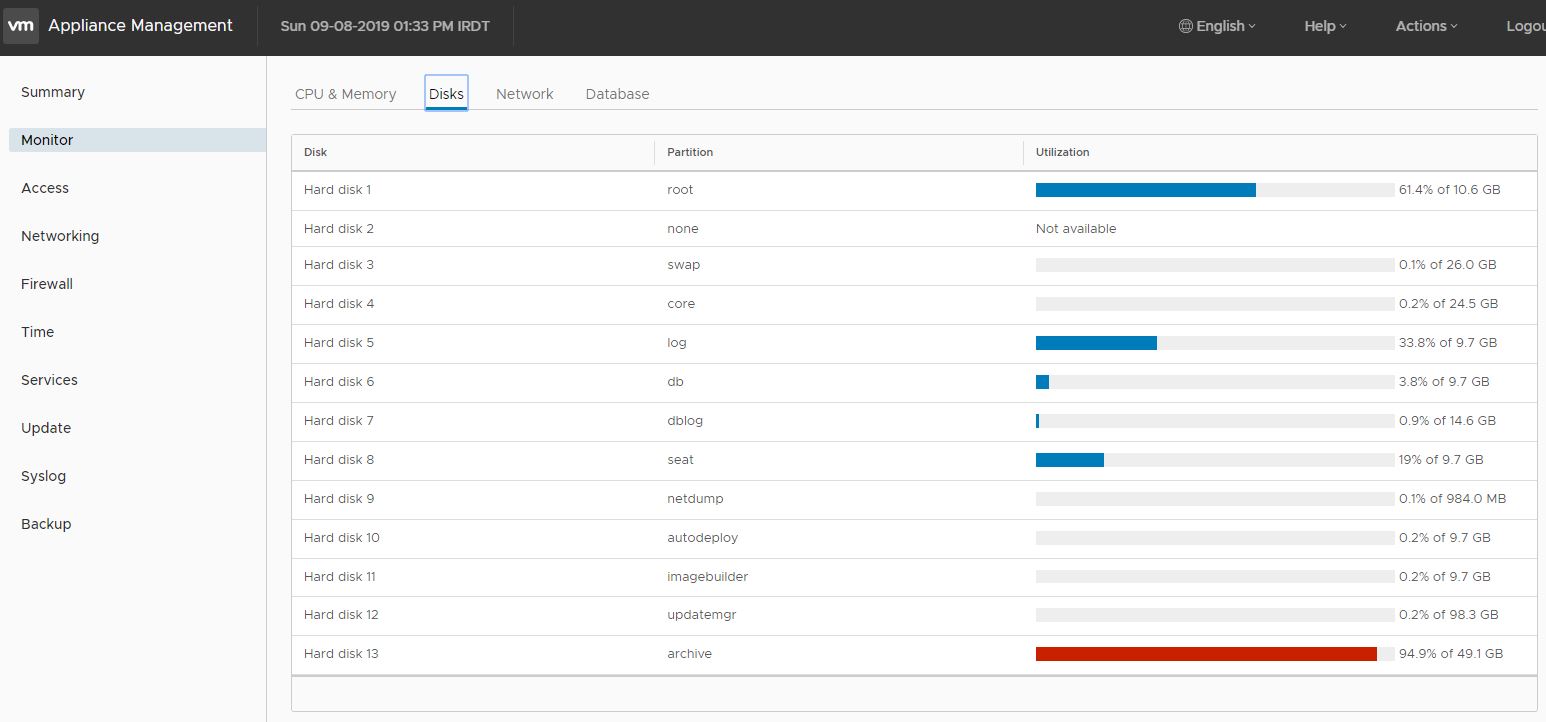
برای رفع این مشکل کافیه برید توی تنظیمات ماشین مجازی اپلاینس VCSA و حجم درایو شماره 13 که مربوط به پارتیشن Archive میشه رو از 50 گیگ به 100 گیگ افضایش بدید. اما این کار کافی نیست. بلکه باید با اتصال به Shell Console از طریق پروتکل SSH و وارد کردن دستور زیر؛ فضای اضافه شده رو به ماشین بشناسونید:
بعد از اجرای دستور زیر و گذشت حدود 5 دقیقه دوباره اوضاع رو به راه میشه 
/usr/lib/applmgmt/support/scripts/autogrow.shنحوه اضافه نمودن آدرس شبکه دوم به VMWare vCenter v6.7
سلام؛
بدون مقدمه این یادداشت رو برای یادآوری خودم و مخاطبین خاصی که به این چالش دچار شدن پست میکنم.
برای تخصیص یک Alternative IP address به VMWare vCenter v6.7 کافیست
- ابتدا طبق روال معمول به ماشین مجازی vCenter یک کارت شبکه اضافه نمایید
- سپس از طریق SHH به کنسول vCenter متصل شده و پس از وارد نمودن دستور shell وارد محیط شل شوید.
- با وارد نمودن دستور زیر به محیط پیکربندی زیرساخت شبکه vCenter وارد می شوید:
/opt/vmware/share/vami/vami_config_net
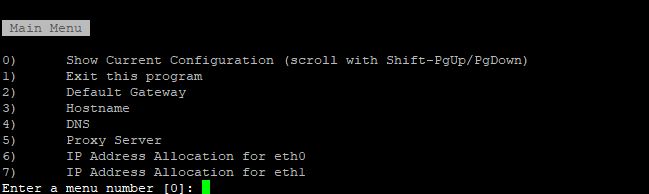
- از منوی باز شده بر حسب نیاز می توانید گزینه 7 را انتخاب و نسبت به تخصیص آدرس شبکه دوم اقدام کنید.
پیکربندی SNMP v2.0 بر روی سیستم عامل VMWare ESXi 6.5
برای پیکربندی SNMP 2 بر روی هاست ESXi 6.5 مراحل زیر را قدم به قدم انجام دهید:
- فعال سازی سرویس SSH از منوی زیر در داخل کنسول فلش یا HTML 5 هاست ESXi
Configure \ Services \ SSH -----> Start

- برقراری ارتباط کنسول از طریق پروتکل SSH

- تنظیم عبارت Community String
esxcli system snmp set --communities

- فعال سازی سرویس SNMP
esxcli system snmp set --enable true
