انجمن مدیران و راهبران شبکه
Network Managers and Administratorsانجمن مدیران و راهبران شبکه
Network Managers and Administratorsدرباره من
 Iman Mojtahedin Yazdi/ایمان مجتهدین یزدی, **
مشاور در امور طراحی ، راهبری و توسعه زیرساخت مراکز داده و امنیت شبکه**
BS. Computer Hardware Eng**
M.Sc. Computer Network Engineering**
Cisco Certified Network Associate, CCNA**
Cisco ID. CSCO11510615**
Mobile: 09155071040**
E-mail: mojtahedin@gmail.com**
ادامه...
Iman Mojtahedin Yazdi/ایمان مجتهدین یزدی, **
مشاور در امور طراحی ، راهبری و توسعه زیرساخت مراکز داده و امنیت شبکه**
BS. Computer Hardware Eng**
M.Sc. Computer Network Engineering**
Cisco Certified Network Associate, CCNA**
Cisco ID. CSCO11510615**
Mobile: 09155071040**
E-mail: mojtahedin@gmail.com**
ادامه...
۱۰ نکته در خصوص امکانات امنیتی سوئیچ های سیسکو - قسمت چهارم
۴- پیکربندی WEB Management Console و مدیریت سطح دسترسی به پانل WEB سوئیچ های مدیریتی Cisco :

امکان دسترسی به وب کنسول مدیریتی سوئیچ های سیسکو بصورت پیش فرض فعال است. این مطلب به این معنی است که درصورتیکه آدرس Management VLAN که عموما VLAN 1 دستگاه سوئیچ خواهد بود در دسترس سیستم رایانه ای شما باشد، با وارد کردن IP Address سوئیچ در Internet Explorer می توانید به کنسول مدیریتی سوئیچ دسترسی پیدا کنید. بنابراین سوئیچ بصورت پیش فرض بر روی پورت شماره 80 منتظر شنیدن درخواست جهت ارائه وب کنسول مدیریتی خواهد بود. این قابلیت بواسطه اعمال دستور زیر در مود Global Configuration حاصل شده است :
ip http server
!
Enter configuration commands, one per line. End with CNTL/Z.
SW-ITNGN(config)# ip http port 3129
فرض کنید Access List شماره 10 بصورت زیر تعریف شده و تنها آدرس رایانه شما که به فرض آدرس 192.168.1.20 باشد در آن Permit شده باشد:
تنظیم دسترسی کاربران به منظور عضو نمودن سیستم ها به دامین
Giving A User The Ability To Add A Computer To The Domain
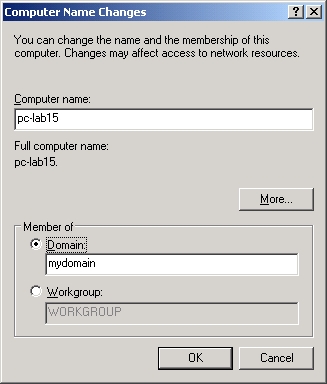
به منظور اعطای سطح دسترسی لازم به یک کاربر جهت عضو نمودن سیستم های موجود در شبکه سازمان به دامین کنترلر، می توانید بر حسب سناریو های مختلف، یکی از روش های زیر را انتخاب و استفاده نمایید :
راه حل اول :
Giving A User The Ability To Add A Computer To The Domain :
- On your domain control, click Start, point to Administrative Tools, and select Active Directory Users and Computers.
- Right click the container that you want the user to create computer accounts in and select Delegate Control.
- Click Next.
- Click Add.
- Add the appropriate user account and click Next.
- Click the Create custom task to delegate option and click Next.
- Click Only the following objects in the folder.
- Click Computer Objects and Create selected objects in this folder. Click Next.
- Click Create all child object and click Next.
- Click Finish.
راه حل دوم :
Changing default number of machines users can add to a domain
Most of you know the limit of 10 times authenticated users can join machines to a domain. Upping the limit, or removing it is a very simple thing to do, however everytime someone asks me, I have to go back to look it up again. At least if I have it on my own blog, I'll know where to start looking next time.
The Active Directory attribute you need to change is mS-DS-MachineAccountQuota which is a property of the domain object. Here's the steps to change it:
- Start ADSI Edit (start/run/adsiedit.msc)
- Expand out the Domain node, right click on DC=<yourdomain>,DC=com and select properties
- Scan down to ms-DS-MachineAccountQuota
- Modify the value as appropriate, or clear the value to remove the limit entirely.
راه حل سوم :
Users cannot join a computer to a domain
To resolve the issue in which users cannot join a computer to a domain, follow these steps:
- Click Start, click Run, type dsa.msc, and then click OK.
- In the task pane, expand the domain node.
- Locate and right-click the OU that you want to modify, and then click Delegate Control.
- In the Delegation of Control Wizard, click Next.
- Click Add to add a specific user or a specific group to the Selected users and groups list, and then click Next.
- In the Tasks to Delegate page, click Create a custom task to delegate, and then click Next.
- Click Only the following objects in the folder, and then from the list, click to select the Computer objects check box. Then, select the check boxes below the list, Create selected objects in this folderDelete selected objects in this folder. and
- Click Next.
- In the Permissions list, click to select the following check boxes:
Reset Password
Read and write Account Restrictions
Validated write to DNS host name
Validated write to service principal name
- Click Next, and then click Finish.
- Close the "Active Directory Users and Computers" MMC snap-in.
Users cannot reset passwords
To resolve the issue in which users cannot reset passwords, follow these steps:
Click Start, click Run, type dsa.msc, and then click OK.
In the task pane, expand the domain node.
Locate and right-click Builtin, and then click Properties.
In the Builtin Properties dialog box, click the Security tab.
In the Group or user names list, click Account Operators.
Under Permissions for Account Operators, click to select the AllowRead permission, and then click OK.
Note If you want to use a group or a user other than the Account Operators group, repeat steps 5 and 6 for that group or that user. check box for theClose the "Active Directory Users and Computers" MMC snap-in.
۱۰ نکته در خصوص امکانات امنیتی سوئیچ های سیسکو - قسمت سوم
Network
Security Best Practices and
Cisco Catalyst Switches
Part # 3

۳- پیکربندی service password-encryption بر روی سوئیچ های شبکه :
دستور عمومی service password-encryption ، سیستم عامل تجهیزات سوئیچ و روتر سیسکو را وادار می سازد نا نسبت به رمزنگاری کلمات عبور، اطلاعات CHAP و سایر اطلاعات از این دست را که در داخل فایل پیکربندی این تجهیزات نگهداری می شود اقدام نمایند. رمزنگاری این اطلاعات کمک شایانی در جلوگیری از افشا شدن اطلاعات محرمانه نام برده شده خواهد بود. اگر این اطلاعات بصورت Clear Text رها شده باشند این امکان وجود دارد تا هنگام پیکربندی و یا صدور دستور Show run توسط فرد غیر مسوولی بر روی مانیتور شما مشاهده و فاش گردند. از این رو شدیدا توصیه می شود تا پس از پیکربندی اولیه سوئیچ یا روتر حتما به عنوان اولین قدم در جهت افزایش امنیت اطلاعات مدیریتی تجهیزات سوئیچ و روتر با استفاده از وارد نمودن دستور زیر نسبت به رمز نگاری اطلاعات محرمانه سوئیچ اقدام نمایید.
service password-encryption بر خلاف روش رمزنگاری دستور Enable secret ،از الگوریتم ساده Vigenère cipher جهت رمزنگاری استفاده کرده و زیاد قابل اطمینان نیست اما بودنش از نبودنش بهتر است، چرا که حداقل با تبدیل متن ساده به کد نافهوم از فاش شدن اطلاعات حیاطی سوئیچ یا روتر با نگاه به صفحه نمایش جلوگیری خواهد کرد.
جهت استفاده از این سرویس بصورت زیر دستورات را وارد نمایید:
ITNGN_CoreSW>ena
Password:
ITNGN_CoreSW#configure terminal
Enter configuration commands, one per line. End with CNTL/Z.
ITNGN_CoreSW(config)#service password-encryption
ITNGN_CoreSW(config)#exit
ITNGN_CoreSW#
%SYS-5-CONFIG_I: Configured from console by console
ITNGN_CoreSW#
سریال جهت اکتیو نمودن VMware Server 2.0
Licensing :
VMware Server for Windows A85AD-FR96T-V934M-43Q28
VMware Server for Linux A2N2T-FR96X-UE33J-49034
جهت دانلود نرم افزار VMware Server هم می توانید از لینک زیر استفاده کنید:
سمینار امنیت شبکه های LAN و تجهیزات کاتالیست سوئیچ شرکت Cisco
عنوان سمینار:
Securing the LAN with Cisco Catalyst Switches
ارائه کننده:
Iman Mojtahedin Yazdi – CCNA
محل برگزاری سمینار:
آزمایشگاه اختلالات امنیتی ( آپا )– دانشکده فنی و مهندسی
دانشگاه فردوسی مشهد
پنج شنبه 16/2/1389 –ساعت 14:00 الی 16:00
جهت دریافت فایل پرزنت سمیناز مذکور بر روی لینک زیر کلیک نمایید.
کلمه عبور مورد نیاز جهت دانلود فایل فوق عبارت "www.itngn.ir" می باشد.